Knitting is one of my many creative hobbies. Taking time for ourselves, time for fun, can seem selfish, but we can’t serve others from a place of suffering and depletion. I have come to learn we must be diligent about making time for self-care, which includes both rest and play. Knitting, along with baking, playing music, and other artistic endeavors, creates a cushion of joy that helps me feel grounded and makes it a little easier to respond to life’s challenges with patience and compassion. Time in my art space nurtures my soul, and I believe knitting can do that for anyone. It is joy, creativity, and an opportunity to practice mindfulness all rolled into one!
The Cushion of Joy site was designed for those who love to learn, as I do. I have often taught classes on knitting and crochet, and thought it would be helpful to provide a resource for when students are practicing on their own after class. I’ve included lessons for beginning knitters, instructional videos, patterns for beginners and more experienced knitters, resources that can be helpful when planning a project or working through a pattern, and a variety of other tips and tricks.
Need more help? Feel free to reach out to me at cushionofjoy@gmail.com. I wish you much joy on your creative journey.
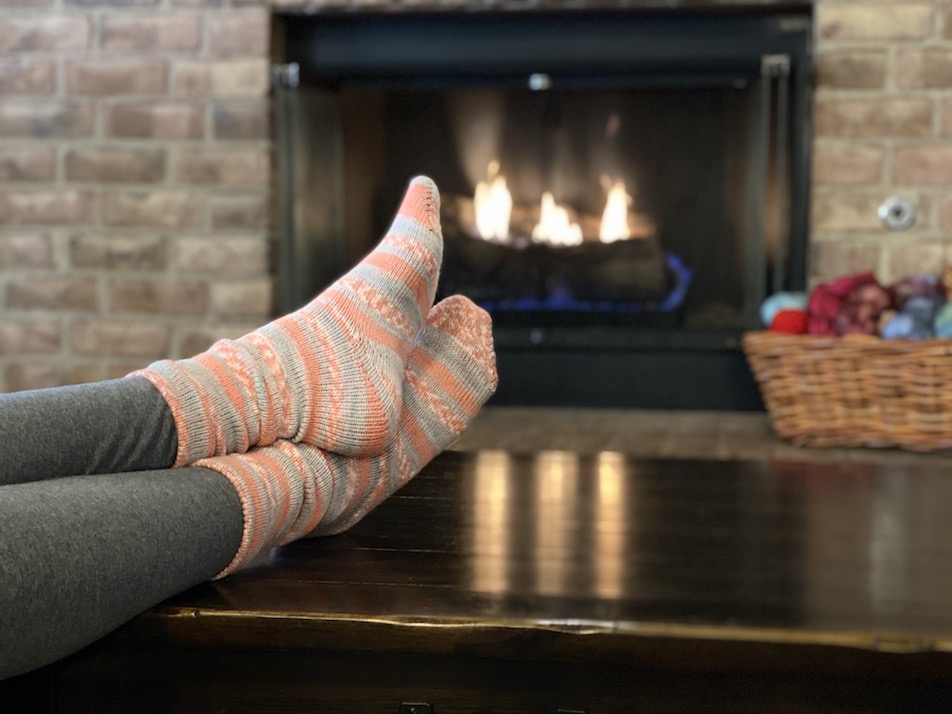
This is a fun pattern that is a quick knit for beautiful slippers made with super-bulky weight yarn. It’s also a great pattern for learning how to knit two at a time toe up socks. This pattern is modified from the Super-Bulky-Weight Toe-Up Socks for Magic Loop by KntiFreedom.com to incorporate Liat Gat’s brilliant faux heel flap.
To understand the basics of the pattern, you might first want to knit the Practice Sock, a quick-knit baby sock that uses this same method. And you might also want to check out this lesson to learn all the skills necessary for knitting these slippers using the two at a time toe up method. Then download the pattern for the slippers and watch a video tutorial below.
Sizes
The pattern is available for Small-Medium or (Medium-Large, shown in parenthesis).
The finished measurements are 7” foot circumference for Small-Medium and 8” foot circumference for Medium-Large. Remember you likely want to have some negative ease; in other words, you want the circumference of the slipper to be about an inch smaller than the circumference of your foot.
The finished length is customized to your exact foot length.
Materials
You’ll need the following materials to knit these bulky weight slippers:
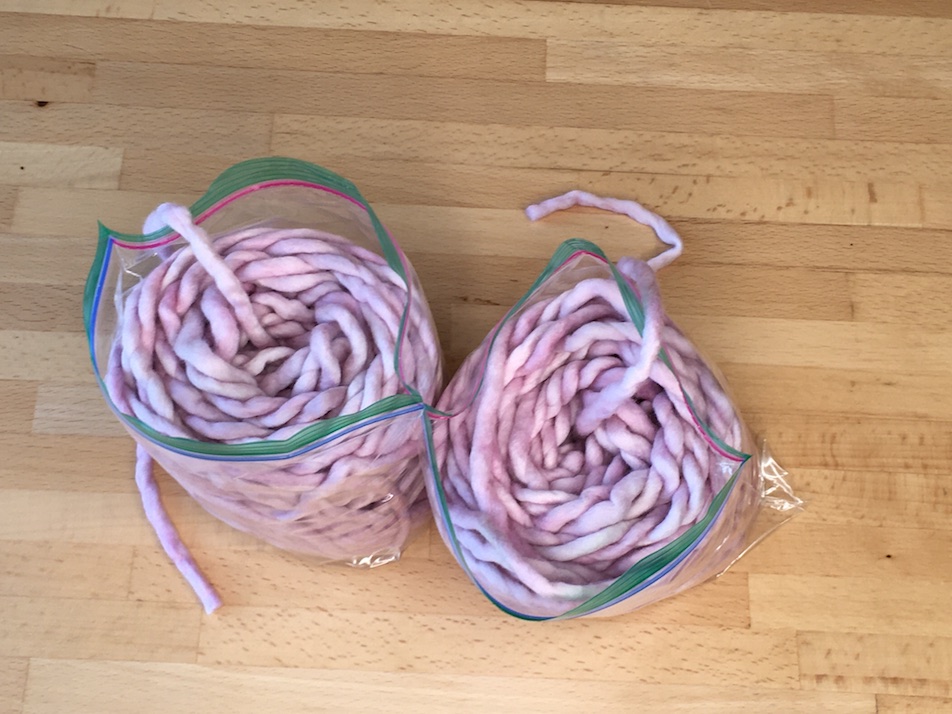
90 yards super-bulky weight yarn. I used Malabrigo Rasta; one skein makes a pair of slippers. If working socks two at a time, you’ll need two separate balls of yarn. I suggest putting each ball into a plastic sandwich bag, and putting those inside a project bag with a pin closing the space in between the balls; see the video below for more information.
US size 13 long (32-40-inch, your preference; I use 40”) circular needle, or size required to obtain gauge (2.5 stitches per inch in stockinette when knitting in the round.)
Safety pin
Tapestry needle
Scissors
Small scrap of smooth yarn in contrasting color for lifeline (optional)
Two stitch markers (optional)
Abbreviation/Terms
The following abbreviations and terms are used in the pattern:
K: Knit
P: Purl
M1L: Make One Left (Use the left needle to pick up the bar in between the first stitch on each needle; for M1L, pick up the bar from the front and knit into the back of the stitch.)
M1R: Make One Right (Use the left needle to pick up the bar in between the first stitch on each needle; for M1R, pick up the bar from the back and knit into the front of the stitch.)
K2tog: Knit 2 Together
P2tog: Purl 2 Together
RS: Right Side
S1: Slip 1
SSK: To Slip Slip Knit, you slip the first stitch from the left needle to the right knitwise, then do the same with the next stitch, then insert the left needle into the front loop of both those stitches and then them together.
Sts: Stitches
W&T: Wrap and Turn
To wrap and turn when knitting and on the RS, slip the first stitch on the left needle to the right needle, purlwise. Bring the yarn to the front, then put the stitch back on the left needle. Turn the work. Bring the yarn to the front to get ready to purl.
To wrap and turn when purling and on the WS, slip the first stitch on the left needle to the right needle, purlwise. Bring the yarn to the back, then put the stitch back on the left needle. Turn the work. Bring the yarn to the back to get ready to knit.
WS: Wrong Side
Instructions
Cast On Using the Turkish Cast On
You could choose to substitute Judy’s Magic Cast On if you prefer. The instructions below are for the Turkish Cast On.
Hold both of the needles together with the tips facing left.
Tie a slip knot in the yarn and put on the top needle.
Wrap the working yarn around both needles for half as many cast on stitches as needed. In this case, wrap it around 4 full times. (The yarn goes around the back of the needles from the slip knot, under the needles, back up the front, over the top to the back and straight down. That’s 1 wrap.)
Wrap the yarn around your fingers as if to knit, securing the yarn in place. Rotate the needles so the tips are pointing to the right. The working yarn will be coming off the top toward the back.
Slip the bottom needle out to be able to knit across. Knit across the stitches on the top needle. (4 sts on the top needle.)
Pull the bottom needle back into work and turn so needles are pointing to the right.
Pull out the bottom needle and get ready to knit across the top needle. The first stitch is the slip knot, which you will drop off the end and out of work; you won’t need that anymore now that the stitches are anchored in place. Knit across the stitches. (4 sts on the top needle, 8 sts total.)
Knit across each needle again.
Pull the bottom needle into work, so all the stitches are on the actual needles, not just the cables. Both tips should be pointed to the right. Fold the work in half with the knit side facing out and purl side folded into the middle.
Place the safety pin into the right side of the fabric (the side with the needle tips.) The beginning of the round will be between the two needles on the side with the safety pin.
When you’re ready to knit, you’ll pull out the back needle, the one with the stitch that has the working yarn attached. You’ll knit in the stitches on the front needle.
Toe
Round 1: *K1, M1R, K until there is one stitch left on the first needle, M1L, K1*, repeat on the other needle (12 sts total).
Round 2: Knit.
Round 3: K1, M1R, K until there is one stitch left on the first needle, M1L, K, repeat on the other needle (16 sts total).
Round 4: Knit
Next Row for Small-Medium Size Only: K1, M1R, K until there is one stitch left on the first needle, M1L, K; K the second needle without increases (10 sts on first needle, 8 sts on second needle, 18 sts total).
Next Row for Medium-Large Size Only: Repeat Round 3 once more (20 sts total).
Foot
Knit in the round until slipper reaches the front of your ankle. You can try on the slipper and pull it up as snug as you like your socks, then flex your foot. Once the knitting reaches your ankle, you’re ready to go to the Gusset. End with the safety pin on the side with both needle tips.
Gusset
Round 1:
Needle 1 ( this will be the heel needle): K1, M1R, K until there is one stitch left on the first needle, M1L, K1.
Needle 2 (instep needle): Knit.
Round 2: Knit.
Repeat Rounds 1-2 until your slipper has 26 (28) sts – 18 sts on heel needle and 8 (10) sts on the instep needle. You may want to add a stitch marker between needles 1 and 2 for each sock to make sure the stitches for the two needles are staying separated.
You may want to add a lifeline to the heel needle (for both socks) after finishing the gusset.
Turn Heel
You will begin working back and forth across heel needle only, instead of knitting in the round; ignore the instep needle for now.
Row 1: K12, W&T.
Row 2: P6, W&T.
Row 3: K until stitch right before wrapped stitch (2 sts before the gap), W&T.
Row 4: P to stitch right before wrapped stitch (2 sts before the gap), W&T.
Repeat rows 3 and 4 until 2 unwrapped stitches remain between the wrapped stitches.
Next row: K across row, picking up and knitting the wraps together with the wrapped stitches as you come to them. Stop when you have picked up and disguised the last wrap on the knit side. Turn.
Next row: Sl 1, P across row, picking up and purling the wraps with the wrapped stitches as you come to them. Stop when you’ve picked up and disguised the last wrap on the purl side.
5 sts remain on the left-hand needle with the wrong side facing you. Turn. 18 total heel sts.
Work Faux Heel Flap
Work back and forth across the next 7 rows to create an 8-stitch-wide “heel flap” while simultaneously decreasing the number of stitches on the heel needle.
Row 1 (RS): Sl 1, K until 1 stitch remains before a visible gap in stitches. SSK. Turn.
Row 1 (WS): S1, P until 1 stitch remains before a visible gap in the stitches. P2Tog. Turn
Repeat rows 1-2 for 8 rows until 1 stitch remains on left hand needle after completing a RS row. Do not turn. K remaining stitch on heel needle. The last gap will be closed on the right hand side in the next section. 11 sts remain on heel needle.
If you are working two socks at a time, repeat the Turn Heel and Work Faux Heel Flap on the second sock now.
Remove the lifeline if you used one.
Finish Heel
Resume knitting in the round.
Knit across instep.
Next round: K1, K2Tog (to close the last gap between sts), K to end of round (10 sts remain on heel needle).
Leg
Knit in the round for 5 to 8 rounds, depending on how long you want the cuff to be and how much yarn you have.
Cuff
Rounds 1-4: *K1, P1*, repeat to end of the round.
Bind Off
Bind off using Jenny’s stretchy bind-off.
Use a tapestry needle to weave in the ends.
Download a PDF of the Pattern
The following is a PDF of the pattern for the Bulky Weight Slippers:
Grab your supplies and knit along with this two-part video tutorial that demonstrates every step of how to knit these two at a time toe up slippers:
Part 1:
Part 2:
Want to Try More Socks?
You might also like the following lesson on knitting two socks at a time, or check out the link below for some more sock patterns using this same method for socks knit with worsted weight and fingering weight yarn:
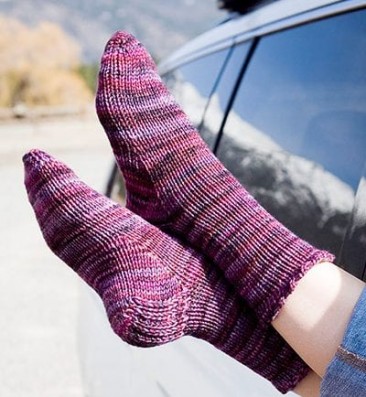
This is a great sock pattern to learn how to knit toe up socks. This same method can be used to knit adult socks. This pattern is modified significantly from the Aran-Weight 2-Hour Toe Up Baby Socks for Magic Loop by KntiFreedom.com to make it for worsted weight yarn and to incorporate Liat Gat’s brilliant faux heel flap. To knit these for babies instead of just for practice, they make a pair of newborn socks.
This sock is worked in the round from the toe up, and the instructions are for magic loop with one long circular needle. Download the pattern and watch a video tutorial below. You might also want to check out this lesson to learn all the skills necessary for knitting this baby sock.
Materials
You will need the following materials to knit a practice sock or pair of baby socks:
60 yards medium weight yarn; I used Lion Brand Vanna’s Choice.
US size 6 long (32-40-inch, your preference; I use 40”) circular needle or size required to obtain gauge; gauge is 5 stitches per inch in stockinette when knitting in the round, although exact gauge is not important if just knitting a practice sock.
Safety pin
Ruler
Tapestry needle
Scissors
Abbreviation/Terms
The following abbreviations and terms are used in the pattern:
K: Knit
P: Purl
M1L: Make One Left (Use the left needle to pick up the bar in between the first stitch on each needle; for M1L, pick up the bar from the front and knit into the back of the stitch.)
M1R: Make One Right (Use the left needle to pick up the bar in between the first stitch on each needle; for M1R, pick up the bar from the back and knit into the front of the stitch.)
K2tog: Knit 2 Together
P2tog: Purl 2 Together
RS: Right Side
S1: Slip 1
SSK: To Slip Slip Knit, you slip the first stitch from the left needle to the right knitwise, then do the same with the next stitch, then insert the left needle into the front loop of both those stitches and then them together.
Sts: Stitches
W&T: Wrap and Turn
To make a wrap and turn when knitting and on the RS, slip the first stitch on the left needle to the right needle, purlwise. Bring the yarn to the front, then put the stitch back on the left needle. turn the work. Bring the yarn to the front to get ready to purl.
To make a wrap and turn when purling and on the WR, slip the first stitch on the left needle to the right needle, purlwise. Bring the yarn to the back, then put the stitch back on the left needle. Turn the work. Bring the yarn to the back to get ready to knit.
WS: Wrong Side
Instructions
Cast On Using the Turkish Cast On
You could choose to substitute Judy’s Magic Cast On if you prefer. The instructions below are for the Turkish Cast On.
Hold both of the needles together with the tips facing left.
Tie a slip knot in the yarn and put on the top needle.
Wrap the working yarn around both needles for half as many cast on stitches as needed. In this case, wrap it around 4 full times. (The yarn goes around the back of the needles from the slip knot, under the needles, back up the front, over the top to the back and straight down. That’s 1 wrap.)
Wrap the yarn around your fingers as if to knit, securing the yarn in place. Rotate the needles so the tips are pointing to the right. The working yarn will be coming off the top toward the back.
Slip the bottom needle out to be able to knit across. Knit across the stitches on the top needle. (4 sts on the top needle.)
Pull the bottom needle back into work and turn so needles are pointing to the right.
Pull out the bottom needle and get ready to knit across the top needle. The first stitch is the slip knot, which you will drop off the end and out of work; you won’t need that anymore now that the stitches are anchored in place. Knit across the stitches. (4 sts on the top needle, 8 sts total.)
Knit across each needle again.
Pull the bottom needle into work, so all the stitches are on the actual needles, not just the cables. Both tips should be pointed to the right. Fold the work in half with the knit side facing out and purl side folded into the middle.
Place the safety pin into the right side of the fabric (the side with the needle tips.) The beginning of the round will be between the two needles on the side with the safety pin.
When you’re ready to knit, you’ll pull out the back needle, the one with the stitch that has the working yarn attached. You’ll knit in the stitches on the front needle.
Toe
Round 1: *K1, M1R, K until there is one stitch left on the first needle, M1L, K1*, repeat on the other needle (12 sts total).
Round 2: Knit.
Round 3: K1, M1R, K until there is one stitch left on the first needle, M1L, K, repeat on the other needle (16 sts total).
Foot
Knit in the round until sock measures 2 inches from cast on edge. End with the safety pin on the side with both needle tips.
Gusset
Round 1:
Needle 1 ( this will be the heel needle): K1, M1R, K until there is one stitch left on the first needle, M1L, K1(10 sts)
Needle 2 (instep needle): Knit (8 sts)
Round 2: Knit.
Repeat Rounds 1-2 three more times until the heel needle contains 16 sts.
I suggest adding a lifeline here, especially if this is your first sock with this method. You only need to put it through the stitches on the heel needle.
Turn Heel
You will begin working back and forth across heel needle only, instead of knitting in the round; ignore the instep needle for now.
Row 1: K10, W&T.
Row 2: P4, W&T.
Row 3: K until stitch right before wrapped stitch (2 sts before the gap), W&T.
Row 4: P to stitch right before wrapped stitch (2 sts before the gap), W&T.
Repeat rows 3 and 4 until 2 unwrapped stitches remain between the wrapped stitches.
Next row: K across row, picking up and knitting the wraps together with the wrapped stitches as you come to them. Stop when you have picked up and disguised the last wrap on the knit side. Turn.
Next row: Sl 1, P across row, picking up and purling the wraps with the wrapped stitches as you come to them. Stop when you’ve picked up and disguised the last wrap on the purl side.
5 sts remain on the left-hand needle with the wrong side facing you. Turn. 16 total heel sts.
Work Faux Heel Flap
Work back and forth across the next 5 rows to create a 7-stitch-wide “heel flap” while simultaneously decreasing the number of stitches on the heel needle.
Row 1 (RS): Sl 1, K until 1 stitch remains before a visible gap in stitches. SSK. Turn.
Row 1 (WS): S1, P until 1 stitch remains before a visible gap in the stitches. P2Tog. Turn
Repeat rows 1-2 for 8 rows until 1 stitch remains on left hand needle after completing a RS row. 9 sts remain on heel needle. Do not turn. K remaining stitch on heel needle. The last gap will be closed on the right hand side in the next section.
If you are working two socks at a time, repeat the Turn Heel and Work Faux Heel Flap on the second sock now.
Finish Heel
Remove the lifeline if you used one. Resume knitting in the round.
Knit across instep.
Next round: K1, K2Tog (to close the last gap between sts), K to end of round (8 sts remain on heel needle, 16 sts total).
Leg
Knit in the round for 1 inch. To help measure, move the safety pin into the first stitch on the first row.
Cuff
Next round: *K1, P1*, repeat to end of the round. Continue working in 1 x 1 rib until ribbed section of cuff measures 1.5 inches.
Bind Off
Bind off using Jenny’s stretchy bind-off.
Remove lifeline, if used.
Use a tapestry needle to weave in the ends.
Download a PDF of the Pattern
The following is a PDF of the pattern for the baby sock / practice sock:
Grab your supplies and knit along with this two-part video tutorial that demonstrates every step of how to knit this baby sock or practice sock pattern:
Part 1:
Part 2:
Want to Try More Socks?
You might also like the following lesson on knitting two socks at a time, or check out the link below for some more sock patterns using this same method for socks knit with worsted weight and fingering weight yarn.
In this post I’m going to share all of my go-to sock knitting tips and favorite patterns. After much trial and error, I have one method of hand knitting socks that has become my favorite: two at a time toe up socks starting using the Faux Heel Flap and Turkish Cast On. Below are links to four different patterns for different sizes of socks or slippers using this technique.
If you haven’t yet knit a practice sock using this method, I strongly recommend doing so before tackling any of the others. It only takes about an hour to knit one of those baby socks, and it uses all the same knitting techniques you’ll need. If you need help knitting two at a time socks, check out this lesson.
The Benefits of Two at a Time Toe Up Socks
The benefits of knitting toe up socks (as opposed to cuff down) are that you can try on the socks as you go to make sure they’ll fit like you want and it’s easier to avoid running out of yarn before finishing the toes (which can happen if you’re knitting cuff down.) The main benefits of knitting socks two at a time are you’ll be sure the socks will be the same size and you won’t get second sock syndrome (where you finish the first sock and then aren’t motivated to knit the second, so you don’t end up with a wearable pair.)
Heels
There are several different ways to knit heels. The following are some good options, all of which work for toe up or cuff down socks:
Faux Heel by Gal Liat – This method from KnitFreedom.com is the method used in all the sock patterns I’ve shared below and demonstrated in my sock knitting lessons. The only drawback of this heel is it takes a little bit to work out the math if you’re going to create a sock size that isn’t already included in one of the patterns below.
Sweet Tomato Heel by Cat Bordhi – After the faux heel flap, this is my most-knitted heel, is easy to do, and always has a beautiful result. You can buy the pattern as part of Cat’s ebook (which includes 17 great sock patterns) and/or watch a free, high quality demonstration from Cat on YouTube.
Fish Lips Kiss by Sox Therapist – This method was designed based on extensive research to create the best fitting socks. The pattern only costs $1 and is the most frequently-purchased pattern on Ravelry.
Afterthought Heel – An afterthought heel allows you to knit the whole sock as a tube, adding a partial row of scrap yarn where the heel will go, and then picking up those stitches later to add a heel. There are many versions; this free Back to Basics Sock Pattern by Rhyflower Knits is my favorite. The only drawback to an afterthought heel is it often doesn’t fit quite as well as some of the others.
SockYarn
While you can use pretty much any yarn you like for slippers or baby sock, if you want to knit a nice pair of socks that will be comfortable to wear all day long, some yarn is better than others. The following are some of my best yarn tips based on my research and experience:
Yarn weight – You can find sock patterns for every possible weight of yarn. However, in my experience, sock weight yarn (fingering) and sport weight are the most comfortable for everyday socks, and fit the best inside most pairs of shoes. Worsted weight is too thick for my taste; I can feel all the stitches on the bottom of my feet. DK is a great choice for a warmer pair of socks.
Yarn material – While Merino wool is almost always my favorite yarn fiber, I find the best sock yarn also includes 10-25% of nylon or something similarly stretchy. This means that while sock yarn is often fingering weight not, not all fingering weight yarn works well for socks. Many sock-knitters also recommended the wool in the yarn to be super wash to help make it easier to care for your socks (more on that below.)
Brands I like – The lowest-cost brand I like is Perfect Pair Yarn by Loops & Threads (bamboo and acrylic), which is available for under $10 from Micaels. Several I like in the $10 to $20 range are Regia by Schachenmayr, Cascade Heritage, Berrocco Sox, West Yorkshire Spinners 4ply, and Opal Yarn. Some higher end yarns ($20+ per skein) by smaller dying artists I love are Miss Babs Tarte and Hot Shot, Wooly Wonka Fibers Aerten MCN Sock Yarn, Cottage Sock by Fleece Artist, and Alfalfa MCN Sock Yarn by Six and Seven Fiber. Note: I don’t ever receive compensation for products I recommended on this website, they’re just the ones personally use and enjoy.
Where to buy yarn – I always recommend buying as often as possible from your local yarn store. In the Oklahoma City area, my favorite store is Yarnatopia. If you can’t find what you need at your local store (or live in an area that doesn’t have one), my favorite online resource with a lot of good sock yarn is SimplySockYarn.com.
How much to buy – When knitting with fingering or sport weight yarn, you’ll need 100 grams, or 400-450 yards, for an adult pair of mid-calf length socks. Note that some sock yarns come in skeins half that size so you’ll need two, although most skeins advertised for knitting socks will have enough to knit a pair.
Organizing your yarn for two at a time socks – There are several tricks for winding and organizing your yarn to not get tangled when knitting two at a time socks. Check out this post for more details.
Self-striping yarn – I love, love, love beautiful self-striping yarn that looks like you knit in fair isle or in stripes with cool colors without having to do any extra work. The one thing to remember is to start each sock at the same place in the pattern if you want your socks to match.
Caring for your socks – I consider hand knit socks to be hand wash only. For super wash wool you can wash on gentle and lower temperature of water and then lay then flat to dry.
Sock Patterns
The following are my favorite sock knitting patterns that all use the same knitting techniques described above:
Learn how to knit two at a time (TAAT) toe up socks by knitting these fun and cozy slippers. They use super bulky weight yarn and come together quickly, which makes them great for learning this method and for knitting slippers as gifts. Once you understand the techniques, you can knit a pair of these slippers in a day. I love them with the Malabrigo Rasta yarn, which makes one pair of slippers. I suggest getting a skein of super bulky yarn and knitting along with me to make your own slippers!
If you haven’t yet knit a practice sock using this method, I strongly recommend doing so before continuing. It only takes about an hour to knit one of those baby socks, and it uses all the same knitting techniques you’ll need for these slippers. The new skills we’ll focus on with this lesson are how to knit socks two at a time using magic loop (including how to set up your yarn), and how to try them on as you’re knitting to make sure they fit like you want.
The benefits of knitting toe up socks (as opposed to cuff down) are that you can try on the socks as you go to make sure they’ll fit like you want and it’s easier to avoid running out of yarn before finishing the toes (which can happen if you’re knitting cuff down.) The main benefits of knitting socks two at a time are you’ll be sure the socks will be the same size and you won’t get second sock syndrome (where you finish the first sock and then aren’t motivated to knit the second, so you don’t end up with a wearable pair.)
Supplies
To knit a pair of these slippers, you’ll need the following supplies:
90 yards super-bulky weight yarn. I used Malabrigo Rasta; one skein makes a pair of slippers. Or any other super bulky yarn would also work. As always, it’s easier to learn a new technique with a light color of yarn.
US size 13 long (32-40-inch, your preference; I use 40”) circular needle, or size required to obtain gauge (2.5 stitches per inch in stockinette when knitting in the round)
Safety pin
Tapestry needle
Scissors
Small scrap of smooth yarn in contrasting color for lifeline (optional)
Two stitch markers (optional)
To help keep your yarn organized (as covered during the lesson below), I also suggest the following:
Two plastic sandwich bags
A small bag to hold both skeins of yarn (the pattern for my bag is included in the link below for how to wind the yarn into two skeins)
A safety pin
If your yarn is not already wound into two balls, you may also want a yarn winder and swift.
How to Knit Two at a Time
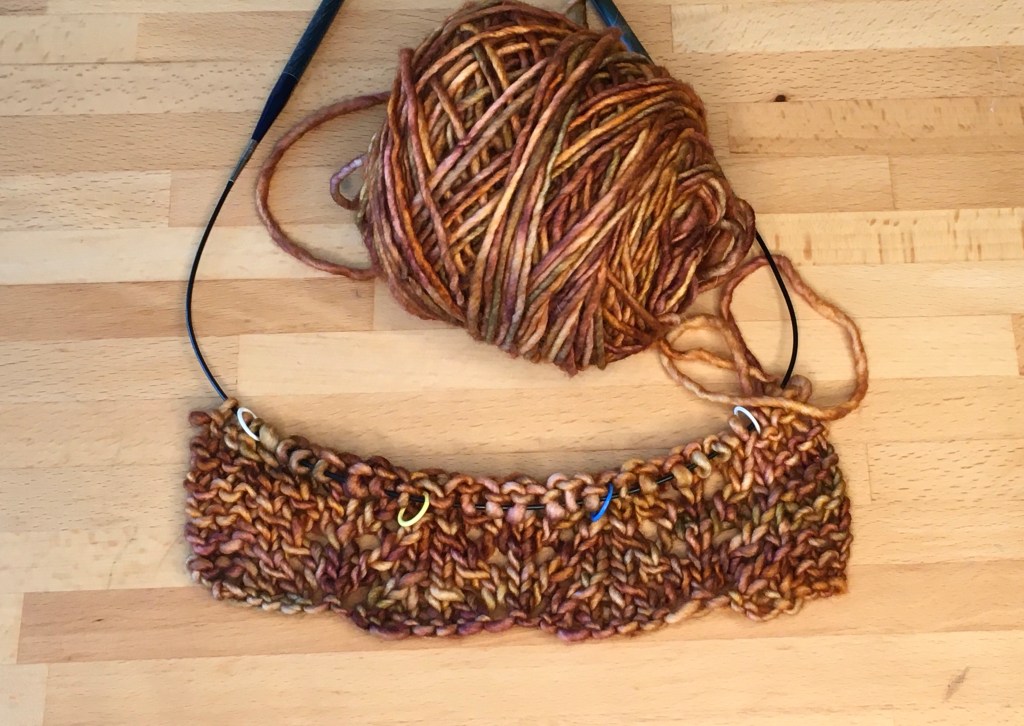
You knit two at a time socks by using a long cable (I prefer 40”), magic loop, and two balls of yarn (more information on organizing your yarn is below.) With both needle tips held together and facing the same direction, you cast on the first sock, then slide those stitches to the end of your needles and cast on the second sock using the other ball of yarn. Then you knit each sock in the round using it’s own ball of yarn. Let’s look at the picture below to illustrate.
In the following picture, there are two socks that I’ve started and have knitted the first several rows. The working yarn for the sock on the right is coming off the back needle. I’m about to pull out the back needle and knit across the front stitches of the sock on the right. When I get to the end of the stitches for the right sock, I’ll put down that yarn and pick up the working yarn for the sock on the left, which is currently coming of the back needle for the left sock. I’ll continue knitting in the same direction I was going, now working the stitches on the front needle for the sock on the left with the yarn for that sock. When I get to the end of the row, I’ll turn the work and knit the other side in a similar fashion. In this way you go around and around, working the front of the right sock then the front of the left sock; after turning your work, you’ll knit the back of the sock that’s now on the right, then the back of the sock that’s now on the left.
Start of two at a time toe up socks
The result is two socks knit in the round side by side, each with their own ball of yarn. The video on the slipper pattern page demonstrates every step of how to do this so you can knit along and make your slippers.
Two at a time toe up socks at the end of knitting the foot
Learning to Knit Two at a Time
To knit two at a time toe up slippers, start by reviewing the following:
Learn how to knit socks by making a practice (baby) sock – this lesson includes all of the techniques you need to knit a sock, except for the steps necessary for knitting them two at a time.
Now that you understand all the techniques, download the pattern and watch the two videos on the pattern page that demonstrate how to knit the two at a time slippers.
Feel free to post a question in the comment section or drop me an email. Happy knitting!
Ready for More Practice?
After you finish your slippers, you might be interested in even more sock patterns, which are available in the post below. Or check out all the available knitting lessons!
This lesson provides everything you need to know when learning to knit socks, including the pattern and videos to knit along and make your first sock. We’re going to learn by starting with a small practice sock (in this case a newborn baby sock) so you can perfect your technique quickly. When I first started knitting, there was something both magical and intimidating about knitting a pair of socks. I couldn’t quite understand how all the angles came together. Some patterns include a lot of complicated picking up from selvedge edges and moving stitches to spare needles, which can be confusing. I’m happy to say the method I’m sharing here is simple to follow so you can be knitting beautiful socks in no time! One great thing about knitting a sock is it’s a small project that can be carried with you anywhere.
After knitting cuff down, toe up, and socks with afterthought heels, my preference is for toe up socks with the heel knit as I go. My main reasons for preferring toe up socks are that I can try the socks on as I go to make sure they’re fitting correctly, and I’m sure I won’t run out of yarn. If you knit cuff down and start by making a really long leg, it’s possible to run out of yarn before finishing the toe, which is a disaster.
As for the heels, I prefer the heel flap that is more often used with cuff down socks. The most common heel (that’s not an afterthought heel) for toe up socks is the Fleegle heel. But my favorite is the brilliant Faux Heel Flap method perfected by Liat Gat from knitfreedom.com; it’s similar to the cuff down heel flap but works when you’re knitting toe up. I’ve adapted her baby sock pattern to incorporate her faux heel flap and create the pattern for this lesson. I’ve also provided patterns that use the same method for knitting adult slippers using super bulky yarn and adult socks using both worsted and fingering weight yarns.
Finally, many people like Judy’s Magic Cast On for toe up socks. While I’m also a fan and use that method for many projects, I sometimes get a nub at the corner when using it for socks, which I don’t like. I find I get more beautiful results more consistently with the Turkish Cast On, which is surprisingly easy to do. So that’s the cast on method I’m teaching here.
After you master this practice sock, I suggest you go to the lesson on knitting toe up socks two at a time. This literally means you’re knitting both socks for the pair at once using a very long cable needle, the magic loop method, and two balls of yarn. There are many benefits to knitting socks two at a time, most importantly that the two socks will always match and when you’re done with the project you have a pair that’s ready to wear (as opposed to finishing one sock and then having to start on the second one.) To help set you up for success with two at a time socks, we’re going to knit this practice sock using magic loop.
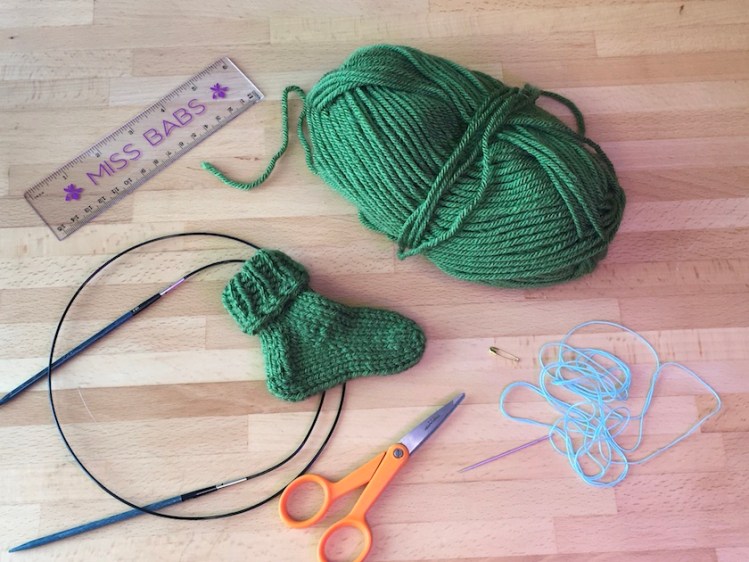
Supplies
To knit a practice sock, you’ll need the following supplies:
60 yards medium weight yarn; I used Lion Brand Vanna’s Choice. As always, it’s easier to learn a new technique with a light color of yarn
US size 6 long (32-40-inch, your preference; I use 40”) circular needle or size required to obtain gauge (5 stitches per inch in stockinette when knitting in the round; exact gauge is not important if just knitting a practice sock)
Safety pin
Ruler
Tapestry needle
Scissors
Small scrap of smooth yarn in contrasting color for a lifeline (optional)
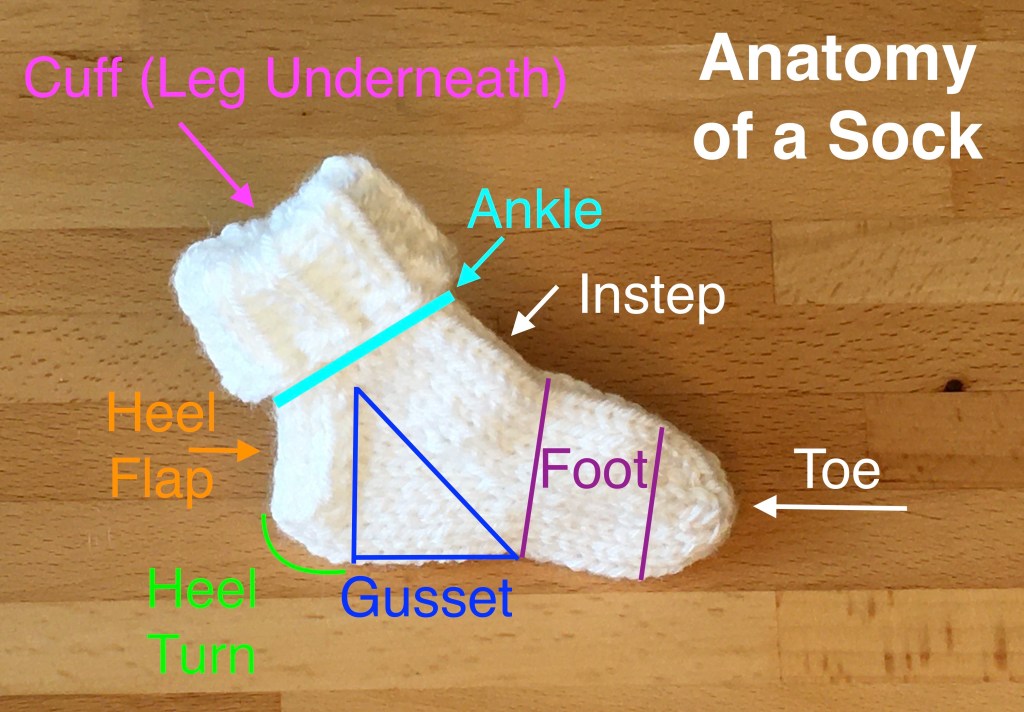
Anatomy of a Sock
The following are common terms used for the different parts of the socks in sock patterns; please also refer to the image below:
Toe – The toe consists of the cast on plus the first few rows of increases to create the rounded part of the sock that goes around the toes.
Foot – The foot is the section of knitting in the round that extends between the toe section and what we think of as the heel of your foot.
Gusset – The gusset is the triangle section where the sock needs to increase stitches as it get larger to travel up the top of the foot toward the instep.
Instep – The instep is what I think of as the top part of the ankle, where the “foot” and “leg” come together at roughly a 90 degree angle.
Heel turn – Opposite the instep, the small rounded part of the sock where it transitions from begin flat on the floor under your foot to running vertically up the back of your ankle and ultimately onto your leg is called the heel turn.
Heel flap – The heel flap is the part of the sock that goes along the very back of your foot, the part that sits just inside the back of your shoe.
Ankle – The ankle part of the sock is the few rows right after you finish knitting the heel and you return to knitting in the round.
Leg – The leg part of the sock is knit in the round and is the tube that extends up your leg after your ankle. Depending on the sock you’re knitting, this could be very short, very long, or somewhere in between. In our practice sock, the leg is fairly short and tucked under the folded-over cuff so you can’t see it in the picture below.
Cuff – The cuff is the very top of the sock. The are many variations for how to finish your sock. In our practice sock, the cuff is a section of rib stitch that’s folded over the leg.
Anatomy of a Sock
Learning to Knit Socks
To learn how to knit your first sock, start by watching the following videos that demonstrate some of the key techniques you’ll need to knit socks:
How to wrap and turn when knitting socks. This is probably the most complicated part of this sock pattern, so it’s worth creating a swatch and knitting along with the video once or twice before trying the full sock. It’s all downhill after the wraps and turns!
You may also want to review the following if these aren’t techniques you use often:
Now that you understand all the techniques, download the pattern and watch the two videos on the pattern page that demonstrate how you put all the steps together to knit a toe up sock.
Feel free to post a question in the comment section or drop me an email. Happy knitting!
Ready for More Practice?
After you finish your practice sock, learn how to knit socks two at a time, or head straight over to some sock patterns. Or check out all the available knitting lessons!
It’s easiest to knit two at a time (TAAT) socks if you first divide the yarn into two smaller cakes or balls. There are also ways of organizing the yarn in a knitting bag that help it from getting tangled while knitting. Armed with these tips, you’ll be ready to knit two at a time socks! A video showing how to do all these steps is below.
Winding the Yarn
If your yarn isn’t already divided into two skeins, that’s your first step. Some knitters suggest you can use both ends of one skein to knit two socks at once (the end that pulls from the center of the ball and the one that wraps around the outside.) I find that method twists the yarns into knots so prefer to take time at the beginning to set the yarn up for more foolproof success, which for me means two separate skeins.
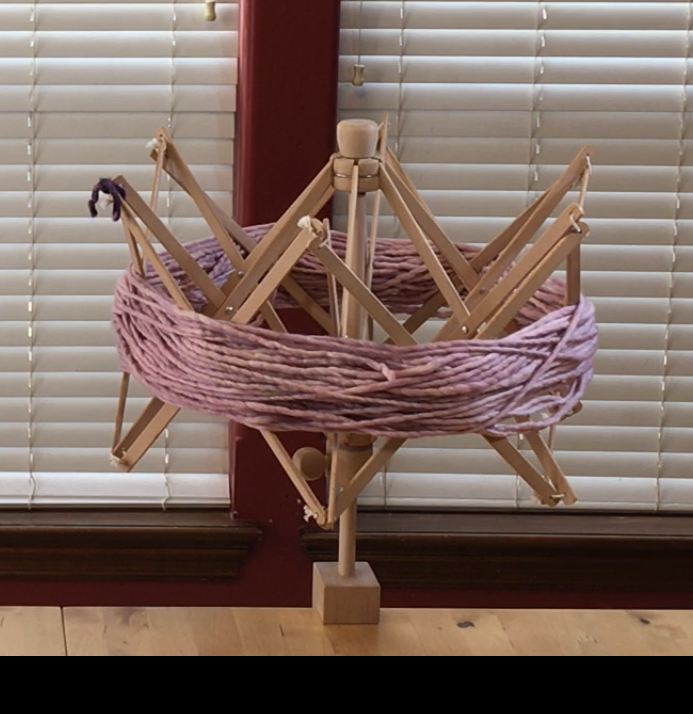
I prefer to wind my cakes with a yarn winder and swift, although I demonstrate several ways of winding yarn in this post. To create two balls of yarn, start by placing the hank of yarn on the swift, then count how many individual pieces of yarn there are. Tie a scrap of yarn on one of the arms of the swift as shown in the photo below. As you begin winding the yarn, count each time the scrap yarn passes by the marked arm so you can count how many strands of yarn have been wrapped into the cake. Stop when half the yarn has been wound, then wind the second cake with the rest of the yarn.
Swift
Separating the Yarn in Your Bag
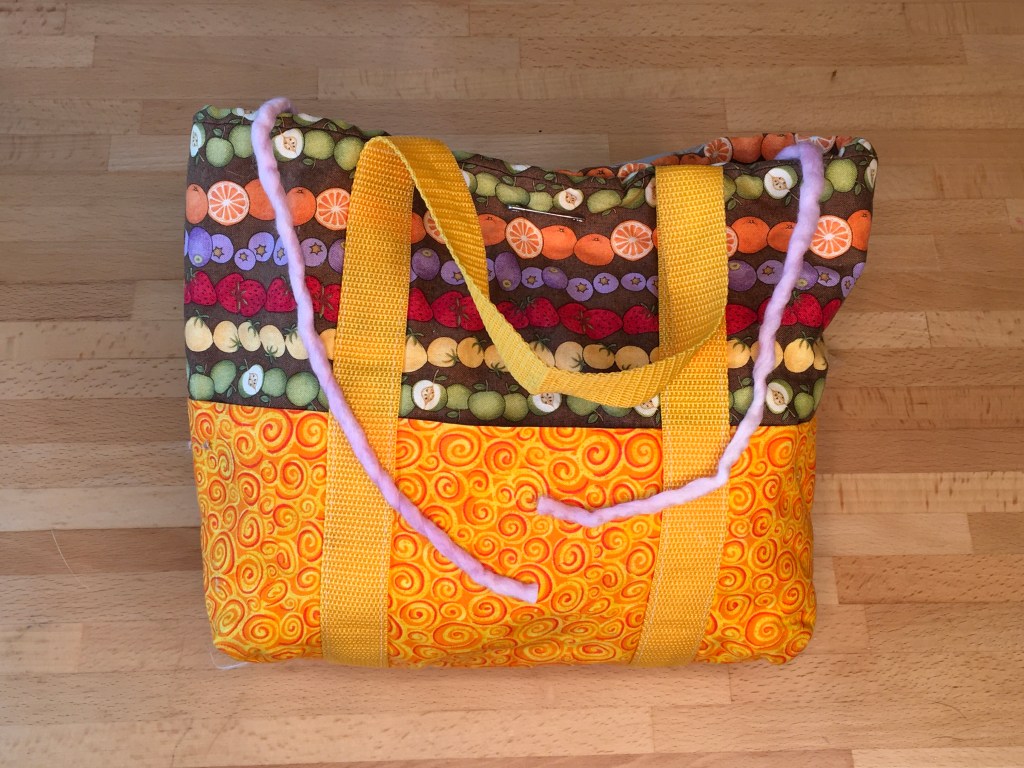
I like to take each ball of yarn and place it in a plastic bag, as shown at the top of this page.
Then place each of those in a knitting project bag, one on each side. Pull the yarn from the center of the cake for each and lift them out of the bag without crossing the yarn. Use a safety pin to close the two sides of the bag so one yarn is coming out of the left and one out of the right. The plastic bags and pin in the center of the project bag keep the two skeins from getting tangled. The bag should look like this:
Project bag with yarn set up to knit two at a time socks
Project Bag Pattern
This is the pattern I used to sew my knitting project bags (like the one above.) I have them in various sizes. The one I use to knit socks is about 12” across and 8” tall. The yarn fits in the big pocket and the little pockets around the sides are great for holding things like stitch markers, row counters, small pairs of scissors, a tape measure, and a crochet hook for easily picking up dropped stitches.
Turn the Bag When You Turn Your Work
As you’re knitting two at a time socks using magic loop, every time you turn your work, simply turn the bag the same way (clockwise or counter-clockwise) so the yarn for the left sock is coming out of the left side of the bag and the yarn for the right sock is coming out of the right side of the bag. It’s quick and easy to do, and this method means you never have any trouble with the yarn getting tangled or confused.
Video Tutorial
The following video shows how to do all of these steps to set up your yarn and project bag for knitting two at a time socks:
Want to Give it a Try?
Now that you know how to set up your yarn, you’re ready to start knitting! Check out the following to get started:
The Turkish Cast On is my favorite way to start knitting toe up socks. The socks look like they start from nothing; it’s a very smooth cast on, as shown in the photo below:
Tip of the toe started with the Turkish Cast On
Many knitters like Judy’s Magic Cast On, but that sometimes leaves a nub at the corner when I’m using it for socks, which I don’t like. I find I get more beautiful results more consistently with the Turkish Cast On, which is surprisingly easy to do. A knit-along video tutorial is below.
How To Knit the Turkish Cast On
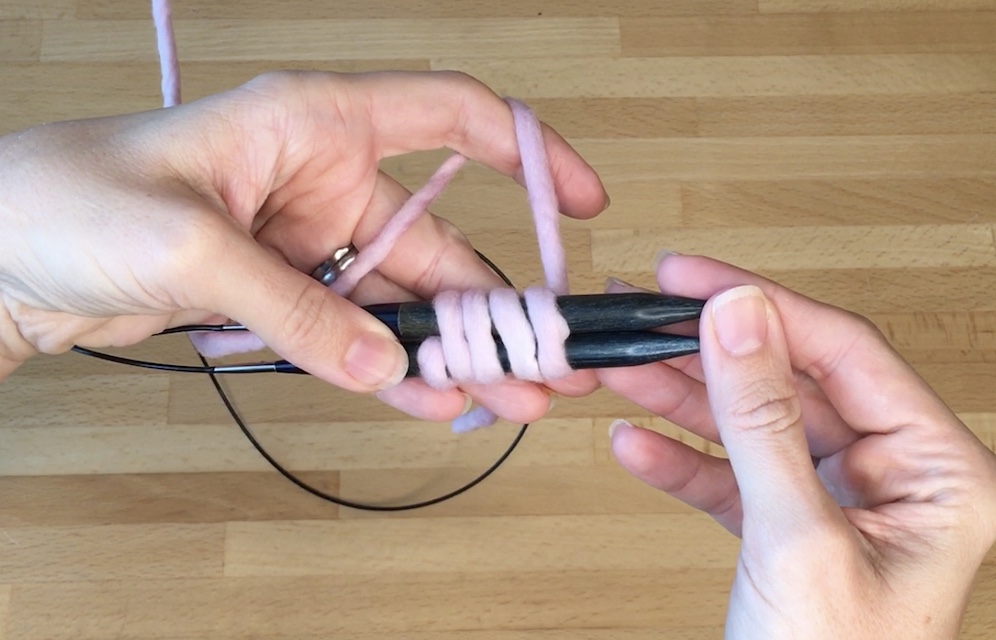
To following are the steps to knit the Turkish Cast On:
Hold both the needles together with the tips facing left.
Tie a slip knot in the yarn and put on the top needle.
Wrap the working yarn around both needles for half as many cast on stitches as needed. If you want to knit along with the video below, wrap the yarn around 4 full times. (The yarn goes around the back of the needles from the slip knot, under the needles, back up the front, over the top to the back and straight down. That’s 1 wrap.)
Wrap the yarn around your fingers as if to knit, securing the yarn in place. Rotate the needles so the tips are pointing to the right. The working yarn will be coming off the top toward the back.
Slip the bottom needle out to be able to knit across. Knit across the stitches on the top needle. (4 stitches on the top needle in my example.)
Pull the bottom needle back into work and turn so needles are pointing to the right.
Pull out the bottom needle and get ready to knit across the top needle. The first stitch is the slip knot, which you will drop off the end and out of work; you won’t need that anymore now that the stitches are anchored in place. Knit across the stitches. (4 stitches on the top needle, 8 stitches total.)
Knit across each needle again.
Pull the bottom needle into work, so all the stitches are on the actual needles, not just the cables. Both tips should be pointed to the right. Fold the work in half with the knit side facing out and purl side folded into the middle.
To continue knitting your socks using the magic loop method: pull out the back needle, the one with the stitch that has the working yarn attached. You’ll knit in the stitches on the front needle.
Video Tutorial
The following video shows how to do the Turkish Cast On:
Want to Give it a Try?
The following lesson shows how to knit toe up socks starting with the Turkish Cast On:
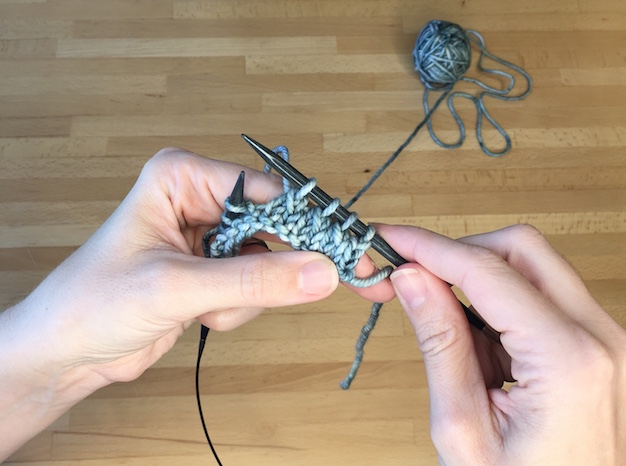
Wraps and turns are used in my sock knitting patterns to help make the rounded heel – the part at the very back and bottom of your heel where the part of your sock that goes under your foot transitions to the part that goes up the back of your heel. In sock knitting, that’s called turning the heel. The steps and a video demonstration are below. Detailed instructions for a sample swatch are below if you’d like to knit along with the video. This is probably the most complicated part of my sock pattern, so it’s a good idea to try it once or twice. After that, the rest of the sock is easy!
The Mechanics of the Wrap and Turn
The wrap and turn technique is slightly different on the knit side and purl side of the work:
Knit Side: When knitting and on the right side, slip the first stitch on the left needle to the right needle, purlwise. Bring the yarn to the front, then put the slipped stitch back on the left needle. Turn the work. Bring the yarn to the front to get ready to purl.
Purl Side: When purling and on the wrong side, slip the first stitch on the left needle to the right needle, purlwise. Bring the yarn to the back, then put the slipped stitch back on the left needle. Turn the work. Bring the yarn to the back to get ready to knit.
Picking Up and Disguising the Stitches
After you knit back and forth for several rows and complete the series of wraps and turns, the next step is to pick up the wraps and disguise them:
Knit Side: If you’re working on the right side (the knit side) of the work, when you come to a stitch that has a wrap, you slip the stitch onto the right needle, then lift the wrap up onto the right needle, insert the left needle into the front of both those loops and knit together.
Purl Side: If you’re knitting on the wrong side (the purl side) of the work, when you come to a stitch that has a wrap (which you may need to identify on the other side of the work), pick up the wrap with the right needle (from the right side of the work) and place it on the left needle, then purl those two stitches together.
That may be easier to understand by watching the video below.
Knit a Test Heel Turn
Here are the full instructions if you want to follow along (and knit along) with the video below:
Setup: Create a 10 stitch swatch with a few rows of stockinette. Stop after a purl row.
Row 1: Knit 8, Wrap and Turn (W&T).
Row 2: Purl 6, W&T.
Row 3: Knit until the stitch right before the wrapped stitch (2 stitches before the gap), W&T.
Row 4: Purl until the stitch right before the wrapped stitch (2 stitches before the gap), W&T.
Repeat rows 3 and 4 until 2 unwrapped stitches remain between the wrapped stitches.
Next row: Knit across the row, picking up and knitting the wraps together with the wrapped stitches as you come to them. Stop when you have picked up and disguised the last wrap on the knit side. Turn.
Next row: Slip 1, Purl across the row, picking up and purling the wraps with the wrapped stitches as you come to them. Stop when you’ve picked up and disguised the last wrap on the purl side.
Video Tutorial Knit-Along
The following video shows how to do the wrap and turn, and pick up and disguise the stitches to make the heel:
Want to Give it a Try?
The following lesson shows how to knit toe up socks using this wrap and turn method for the heel:
This is a great lesson that lets you practice how to knit lace and also learn how to customize a pattern while knitting the beautiful Fall Leaves Shawl. The lace is a four-row repeat, which creates a nice rhythm once you get used to the flow. A combination of yarn overs, SSKs, and K2Togs create the lace. Here are a few tips and tricks to set you up for success:
Start with a swatch – While I’m always in favor of knitting a swatch, it’s particularly helpful on this project. The first benefit is you get to practice the lace pattern so it’s familiar before you start your shawl. And second, you can test the needle size with your yarn to make sure the fabric flows like you want. The pattern page describes how to knit the swatch and you can knit along with the demonstration video linked below.
Stitch markers – I always put stitch markers in between the repeats of the lace, which help me make sure I’m not missing stitches. If I get to the next stitch marker exactly after I’ve finished my last stitch of the pattern, I’m usually in good shape.
Count on the purl side – If you’re going to have issues with this pattern, it will likely be in forgetting a yarn over. Leaving out a yarn over means when you come back to knit the next row of lace, you’ll be one stitch short. A good way to handle that and keep it from being a big problem is to count the stitches in between the stitch markers when doing the purl row – there should always be 7 stitches in between the stitch markers for the lace section. If you forgot the yarn over and only have 6 stitches, the video linked below that shows how to get started with the lace pattern demonstrates how to pick up a stitch without having to rip back your work.
Lifeline – Until you get proficient with the pattern, you might consider using a lifeline each time you start the four row repeat. That way you can save your work and easily get going again, confident you haven’t lost any stitches.
Blocking – Lace always opens up and smooths itself out when you block it, so don’t skip that step when knitting this shawl. You can see an easy comparison in the photo at the top of the page. The white swatch has not yet been blocked whereas the smooth finished rust colored shawl has been blocked; you can see how much clearer the lace pattern becomes after blocking.
Customize the size – A rectangular shawl with a repeated lace pattern like this is great for customizing because it’s easy to adjust things like how wide you want the borders, and how wide and long you want the finished shawl to be. All the instructions (including the math) for how to customize your shawl are included on the pattern page.
Solid colors – A variegated yarn will not work with lace, you’ll just lose the pattern. See below for a comparison. The two samples below were knit with the exact same lace pattern for this shawl, but you can’t even see the pattern with the variegated yarn on the left. So it’s best to choose a yarn with a solid color or only a very slight color shift.
Variegated yarn example
Solid color yarn example
Materials
Here’s everything you will need to knit your shawl:
Yarn in either a solid or semi-solid color. You will need 600-800 yards of a medium (worsted or aran) weight yarn or 800-1000 yards of a DK weight yarn depending on how big you want to make your shawl.
24” circular needles in the size that allows your lace to drape the way you like. I suggest starting with the needle size recommended with the yarn you choose, or size US 8 for medium yarn and size US 6 for DK.
I also suggest needles 1mm larger than the size you use for the main body of the shawl for both for the cast on and bind off.
12 or so stitch markers to place between each repeat of the lace pattern.
Getting Started with Your Shawl
To knit the lace in the Fall Leaves Shawl, start by reviewing the following:
How to customize your shawl, which is described on the pattern page
Knit Along
Now that you understand all the techniques, download the pattern and watch the video on the pattern page that walks you through how to knit the swatch and get started with your shawl. You can knit along to master the lace work of the shawl.
Feel free to post a question in the comment section or drop me an email. Happy knitting!
Ready for More Practice?
The Stone Point Poncho is another great lace pattern. Or check out all the available knitting lessons.
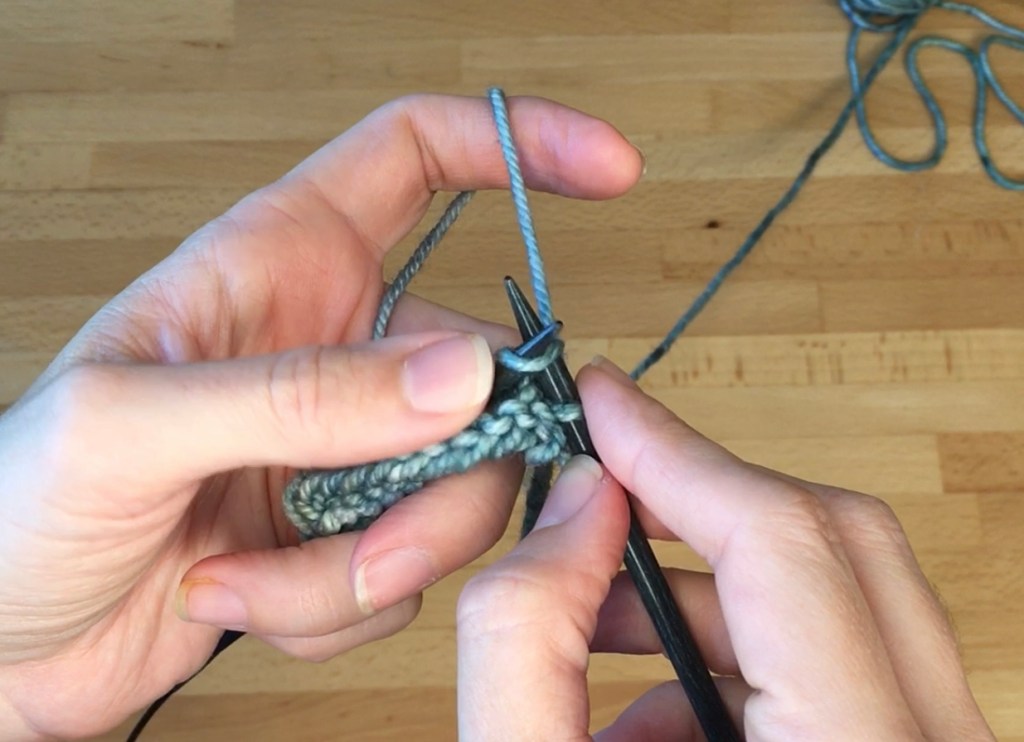
Slip Slip Knit (abbreviated SSK) is a very common method for decreasing stitches. K2tog (knit two together) is another method of decreasing. SSK stitches will lean to the left and K2tog stitches will lean to the right; in the photo above, you can see how the first three SSK stitches (from left to right) are slanting to the left just below the needle. The following steps describe how to do a SSK:
Insert the right needle into the first stitch on the left needle, knitwise (as if to knit.) Instead of knitting, slip that stitch to the right needle.
Repeat step 1 with a second stitch so you’ve now slipped two stitches to the right needle.
Insert the left needle into the front loops of both the stitches you just slipped. Wrap your working yarn around the right needle like usual and knit the two stitches together.
Video Demonstration
The following video demonstrates how to do the SSK decrease:
Want to Give it a Try?
The following is a great pattern that features both K2tog and SSK decreases: