
This lesson provides everything you need to know when learning to knit socks, including the pattern and videos to knit along and make your first sock. We’re going to learn by starting with a small practice sock (in this case a newborn baby sock) so you can perfect your technique quickly. When I first started knitting, there was something both magical and intimidating about knitting a pair of socks. I couldn’t quite understand how all the angles came together. Some patterns include a lot of complicated picking up from selvedge edges and moving stitches to spare needles, which can be confusing. I’m happy to say the method I’m sharing here is simple to follow so you can be knitting beautiful socks in no time! One great thing about knitting a sock is it’s a small project that can be carried with you anywhere.
After knitting cuff down, toe up, and socks with afterthought heels, my preference is for toe up socks with the heel knit as I go. My main reasons for preferring toe up socks are that I can try the socks on as I go to make sure they’re fitting correctly, and I’m sure I won’t run out of yarn. If you knit cuff down and start by making a really long leg, it’s possible to run out of yarn before finishing the toe, which is a disaster.
As for the heels, I prefer the heel flap that is more often used with cuff down socks. The most common heel (that’s not an afterthought heel) for toe up socks is the Fleegle heel. But my favorite is the brilliant Faux Heel Flap method perfected by Liat Gat from knitfreedom.com; it’s similar to the cuff down heel flap but works when you’re knitting toe up. I’ve adapted her baby sock pattern to incorporate her faux heel flap and create the pattern for this lesson. I’ve also provided patterns that use the same method for knitting adult slippers using super bulky yarn and adult socks using both worsted and fingering weight yarns.
Finally, many people like Judy’s Magic Cast On for toe up socks. While I’m also a fan and use that method for many projects, I sometimes get a nub at the corner when using it for socks, which I don’t like. I find I get more beautiful results more consistently with the Turkish Cast On, which is surprisingly easy to do. So that’s the cast on method I’m teaching here.
After you master this practice sock, I suggest you go to the lesson on knitting toe up socks two at a time. This literally means you’re knitting both socks for the pair at once using a very long cable needle, the magic loop method, and two balls of yarn. There are many benefits to knitting socks two at a time, most importantly that the two socks will always match and when you’re done with the project you have a pair that’s ready to wear (as opposed to finishing one sock and then having to start on the second one.) To help set you up for success with two at a time socks, we’re going to knit this practice sock using magic loop.
Supplies
To knit a practice sock, you’ll need the following supplies:
- 60 yards medium weight yarn; I used Lion Brand Vanna’s Choice. As always, it’s easier to learn a new technique with a light color of yarn
- US size 6 long (32-40-inch, your preference; I use 40”) circular needle or size required to obtain gauge (5 stitches per inch in stockinette when knitting in the round; exact gauge is not important if just knitting a practice sock)
- Safety pin
- Ruler
- Tapestry needle
- Scissors
- Small scrap of smooth yarn in contrasting color for a lifeline (optional)
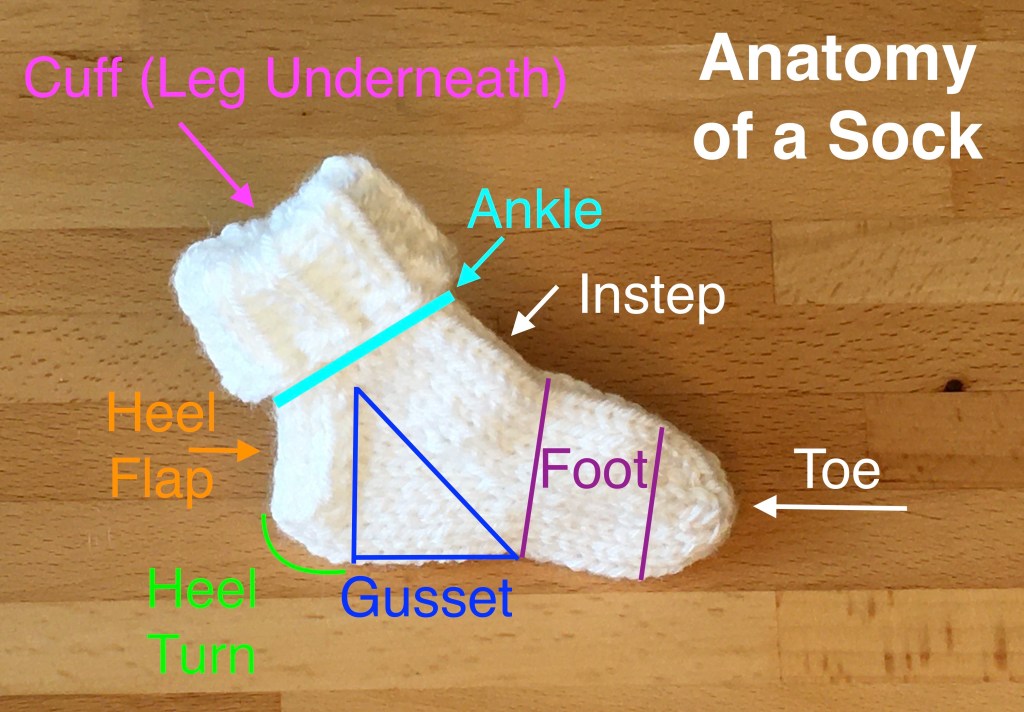
Anatomy of a Sock
The following are common terms used for the different parts of the socks in sock patterns; please also refer to the image below:
- Toe – The toe consists of the cast on plus the first few rows of increases to create the rounded part of the sock that goes around the toes.
- Foot – The foot is the section of knitting in the round that extends between the toe section and what we think of as the heel of your foot.
- Gusset – The gusset is the triangle section where the sock needs to increase stitches as it get larger to travel up the top of the foot toward the instep.
- Instep – The instep is what I think of as the top part of the ankle, where the “foot” and “leg” come together at roughly a 90 degree angle.
- Heel turn – Opposite the instep, the small rounded part of the sock where it transitions from begin flat on the floor under your foot to running vertically up the back of your ankle and ultimately onto your leg is called the heel turn.
- Heel flap – The heel flap is the part of the sock that goes along the very back of your foot, the part that sits just inside the back of your shoe.
- Ankle – The ankle part of the sock is the few rows right after you finish knitting the heel and you return to knitting in the round.
- Leg – The leg part of the sock is knit in the round and is the tube that extends up your leg after your ankle. Depending on the sock you’re knitting, this could be very short, very long, or somewhere in between. In our practice sock, the leg is fairly short and tucked under the folded-over cuff so you can’t see it in the picture below.
- Cuff – The cuff is the very top of the sock. The are many variations for how to finish your sock. In our practice sock, the cuff is a section of rib stitch that’s folded over the leg.
Learning to Knit Socks
To learn how to knit your first sock, start by watching the following videos that demonstrate some of the key techniques you’ll need to knit socks:
- How to knit the Turkish Cast On.
- How to knit the M1L and M1R increases.
- How to wrap and turn when knitting socks. This is probably the most complicated part of this sock pattern, so it’s worth creating a swatch and knitting along with the video once or twice before trying the full sock. It’s all downhill after the wraps and turns!
You may also want to review the following if these aren’t techniques you use often:
Sock Knit Along with the Instructional Video
Now that you understand all the techniques, download the pattern and watch the two videos on the pattern page that demonstrate how you put all the steps together to knit a toe up sock.
Feel free to post a question in the comment section or drop me an email. Happy knitting!
Ready for More Practice?
After you finish your practice sock, learn how to knit socks two at a time, or head straight over to some sock patterns. Or check out all the available knitting lessons!


